
|
The DFD1 is so easy to put together that instructions on putting the unit together will not be given. I did take some pictures as I put one together and they can be found here: DFD1 Construction Pictures Do not solder the 3 10K multiturn pots on the circuit board. They are relay switched to provide the correct offset for the different bands. If you have one already built up, you will need to remove the pots for the coarse and the prescale adjustments for the counter to work on all four bands. The fine adjustment is set to zero. Emphasis here will be getting the DFD1 to work with the receiver to output the correct frequencies. Construction of the relay switching circuit is a tad more difficult than using the DFD2. But it is easier to connect to the receiver as only two wires need to interconnect to the receiver, and only one small coax cable to the VFO. These instructions can also be used to set other frequency counters that have an offset function to work with the receiver. The problem of birdies entering the receiver from the frequency display will also be addressed and can be used for the DFD2, as well as the DFD1. |
|
Parts needed: If the DFD1 is ordered with the receiver kit the 5 volt relay, 220 ohm resistor, diode and capacitor will be included with the DFD1 bag of parts. You will need one multiturn 10K pot (or equivalent) and hook-up wire. Setting the offsets: ____Check to make sure you have soldered in the jumper for the Fine Adjustment, grounding the center terminal. If the Fine Adjustment pot was already installed, set it for zero reading between the center terminal and ground.____Ground the VFO input to the counter PCB. There will be false readings if this is not done. ____The two wires going to the receiver do not need to be connected to set the offsets. ____Apply power and make sure there is no power to the relay. The 30/17 Crystal Filter connection will be left ungrounded. ____Set V1 and V2 (see circuit diagram) to 3.546.88 MHz, or as close as possible to 3.546.00 MHz. Using a VOM, set the voltages close to the ones on the circuit diagram, then use the reading on the display to finish the settings. You will be adjusting the relays that are wired across from each other (the NC connections) on the relay. ____Ground the lead from the relay to the receiver (the 30/17 Crystal Filter connection). ____Set V3 and V4 (see circuit diagram) to 4.000.00. You should be able to get it right on frequency. As above, set the voltages close to the ones on the circuit diagram, then use the reading on the display. You will be adjusting the relays that are wired across from each other (the NO connections) on the end of the relay. ____Mount the interface circuit where you want and connect the two wires that go to the receiver. |
|
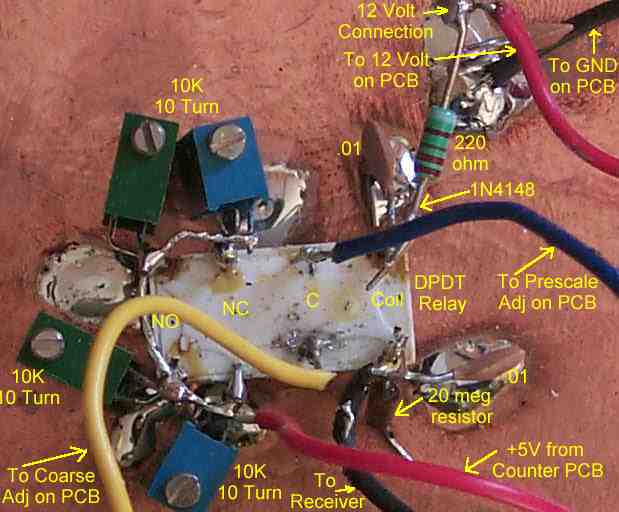
Shown is the "dead bug" illustration of how to wire the relay and multiturn pots. The bottom pin of the pots is soldered to the ground plane, the center pin is connected to the relay, and 5 volts (taken from the PCB of the counter) is connected to the top pins. NO - normally open position of the relay The 20 meg resistor and nearby .01 cap are used to help secure the relay to the ground plane. The .01 helps with spike protection. The .01 and 1N4148 on the other coil connection are the main spike protection components. When building the circuit, wiring the above parts helps keep the relay stay put on the ground plane while the multiturn pots are wired on the relay. The relay is a 5 volt part (supplied with the kit when ordered with the receiver), and a 220 ohm resistor is needed to provide a voltage drop to the relay to prevent it from burning up. A much neater layout can be achieved with little effort! |
|
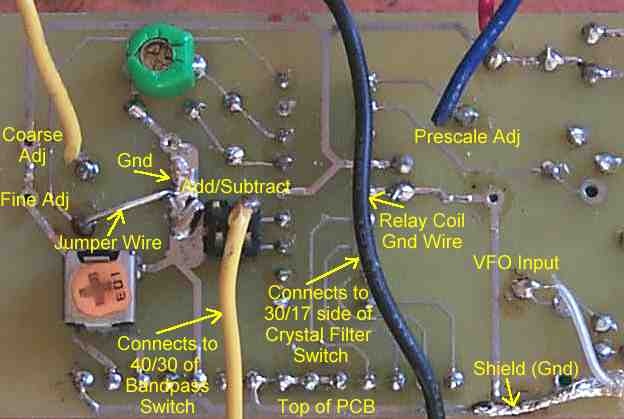
The first thing to notice is the jumper wire where the Fine Adj pot is supposed to go. The connection to the center of the pot is tied to ground so that the fine adjustment is set at zero frequency. The relay coil ground wire does not connect to the PCB, but is laid across the picture so it can be identified. The yellow wire in the middle of the image connects to the +/- (Add/Subtract) jumper. The yellow wire connects to the pin that faces toward the center of the board. The other pin (on the left not connected) goes to ground. The Add/Subtract jumper is used to add or subtract the VFO to the offset set by the Prescale and Coarse Adjustments. On 40 and 30 meters, the offset is subtracted from the VFO frequency. On 20 and 18 meters, the offset is added to the VFO frequency. The Coarse and Prescale Adjustment connections are made to what was the center pin of the pot. The other two outside pins of the pots connect to GND or 12 Volts. If you hit the wrong connection point, the pots will not adjust the offset frequency. |
|
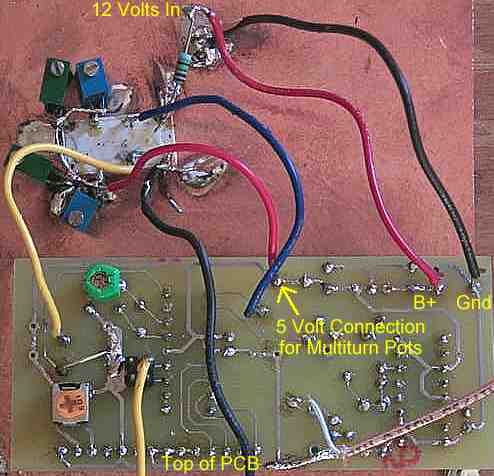
Note the 12 Volt and Ground connections on the right side of the PCB. The 5 volt connection for the multiturn pots is taken from what would have been the 5 volt connection for the Prescale pot. Make sure you do not accidentally pick a 12 volt connection for the multiturn pots, as that will blow the counter IC. The five volt regulator for the PCB is mounted between the 12 Volt connection and the 5 volt connection to the pots. |

|
The two wires coming down off the bottom of the picture go to the receiver Bandpass Switch and the Crystal Filter Switch. A shield for the top of the box is also needed to help eliminate birdies getting into the receiver. Since the only place to put the counter is underneath the first mixer, a top shield is almost more important than the side shields. |
|
The elimination of birdies from the AADE Frequency Counters, or from any counter, needs to be approached from several different angles. Filtering the power supply, shielding the counter, and having a good ground attached to the receiver all need to be considered. Filter the power supplyThe best way to isolate the power supply line to the counter is by the use of a three terminal regulator (78xx series of regulators). Use a 7808 or a 7809 just inside the shielding for the counter. Place a .01 bypass ceramic, plus a 100 mfd (or any high value electrolytic) at the input terminal of the regulator. A 2.2 mfd tantalum or electrolytic needs to go at the output terminal of the regulator. Do not place a .01 at the output of the regulator, as this may cause oscillations at the regulator. Higher value electrolytics at the output may be used, but the optimal value is a 2.2 mfd. ShieldingA good shield is absolutely necessary. When the counter is placed right below the First Mixer, as shown in the prototype pictures on this web site, no shielding yields birdies that nail the S-Meter. When shielding is installed, especially a top cover placed directly between the counter and the First Mixer, the birdies fall to where there are no S-Meter readings. Distance from the receiver also helps. When the receiver boards are placed in a box, with the counter placed 2" to 4" away on the front panel, the birdies are much easier to eliminate. Proper Drive LevelsDriving the frequency counter input too strong is a major reason for birdies getting into the receiver. Using a 3.3pf capacitor right at the output of the VFO (Picture) provides a drive level that keeps birdies at a minimum. A peak to peak reading on an oscilloscope is about .6 volt. Driving the Frequency Counter from the output of the VFO also eliminated a drop off of a reading from the counter when the VFO drive level to the mixer was adjusted to a minimum. The output of both the VFO was affected very little by the use of the 3.3pf capacitor. A Good GroundA good earth ground is needed for any of the suppression techniques to work, especially the power supply and the shielding. A "floating" receiver, one with no ground, cannot effectively utilize the bypass elements used in the receiver, not only for counter birdie elimination, but from signals traveling from the first board to the second. The receiver has been supplied with a lot of bypass caps and RF chokes to eliminate almost all the problems associated with signals going where they are not supposed to go, but without a good ground, the suppression is not as effective. Final NoteThe high impedance levels of this receiver, and the high gain of the VFO amplifiers make the problem worse with this receiver than with many other receivers using lower impedance levels and less gain in the VFO circuitry. Plus a high gain mixer contributes to the problem, because even if you tap off the end of the VFO amplifiers, the mixer makes the problem worse. In some cases, band noise helps cover up a lot of the residual birdies in the receiver. The birdies are not amplified the same amount as band signals, and in most cases when a band is wide open, or an outdoor resonate antenna is used, there is little problem with the counter birdies. The most effective solution is to add an on-off switch to the counter, so when absolute freedom from interference is wanted, the counter can simply be shut off, and then turned on monetarily to check your operating frequency. |
Send E-Mail || Amateur Radio Receivers || Electroluminescent Receiver || Back to DFD2 Instructions