DDS VFO
DDS Amplifiers
T/R Switch


DDS VFO
Narrow .01 cap || 18 Pin Socket || Resistors || Capacitors .01, .1 || Wire Jumper || RF Choke/Electrolytic Capacitors
LEDs || Push Button Switches || Rotary Encoder || 1N914 Diode || 16 Pin Female Header || 5V Power Parts
LCD Display || Wire Loops || PIC IC 16F628 || LCD Brightness || Test LCD/PIC || AD9851/AD9850 DDS Module
VFO Amplifiers
Capacitors || Resistors || MOSFET/500K/LEDs/Photo/T1-1T || 2N5109 Transistor || FT50-75 Ferrite
Diode Transmit/Receive Switch
Resistors || 1N914s/2N2907 || Capacitor/RF Chokes || Wire Loops/Key Jumper
Double Checking Your Work

Bandpass Filters, TV & FM Filter and RF Amplifier


Board 1, Section 1

DDS VFO


Mounted on spacers ready for parts.

All parts for the DDS VFO are in the bag marked "DDS VFO Parts"

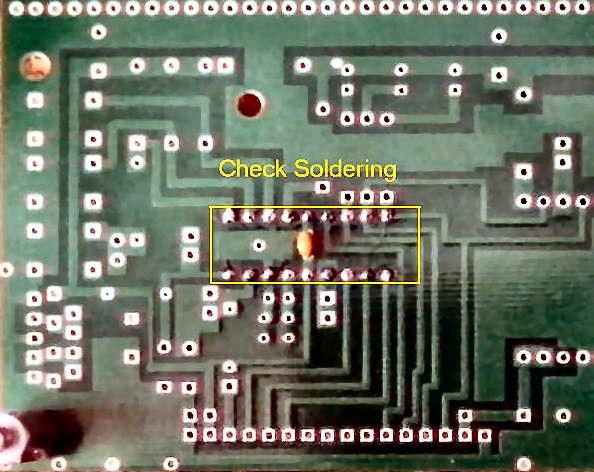
____1 - Narrow .01 capacitor, This cap has .02" pin spacing and goes in the exact middle (four pins on each side of the cap) of the PIC on the bottom side of the board.

Lift the capacitor about 1/6" above the board and solder.

After soldering, clip the leads on the top side of the board as close to the board as you can.

____1 - 18 pin socket for the PIC. Notice the notch on one end of the socket and match it to the notch on the footprint on the PCB.

Solder two pins to the PCB (diagonal opposite to each other), while holding the socket against the top side of the PCB. Then solder the other pins.

Please Note: Getting the pins soldered correctly to this board means that the DDS has a 99% change of working on the first try. Use a magnifying glass to double check your soldering!

____4 - 10K resistors 1/4 Watt
____2 - 10K resistors 1/8 Watt

____3 - .01 capacitors, blue color, marked 103
____2 - .1 capacitors, marked 104

____1 - 1 inch wire jumper, a cut resistor lead will work

This wire sets the Oscillator for the PIC 16F628. This oscillator type is "Internal Oscillator" and the frequency is set by a resistor from Pin 16 to ground. The internal oscillator was used because it radiated the lowest RF signal from the PIC, making it quieter to use with the receiver.

In this case the resistor value is zero, which sets a Frequency of 10.4 MHz for the Internal Oscillator. This allows the use of either an optical (128 step) or mechanical encoder (24 step). The Configuration Word for this Oscillator is ER_OSC_NOCLKOUT.

With the PIC 16F628A, the above feature is not included. The 4 MHz internal oscillator is used and the jumper is not installed. A note on the parts list will let you know which PIC you have.

Notice the other solder points around this area, Pin 15 and Pin 16 of the PIC. This allows putting in a Crystal with 12pf caps if desired. Check Circuit Details for more information.

____1 - Large RF Choke 83uH
____1 - 330 mfd Electrolytic Capacitor, short lead is ground side.
____1 - 10 mfd Electrolytic Capacitor, short lead is ground side.

When soldering the capacitors, you may want to push against the top of the capacitor while soldering the first lead so that they are flat against the PCB.

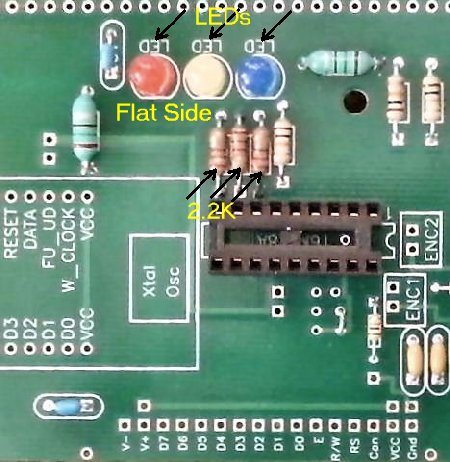
____3 - 2.2K resistors, install first
____3 - LEDs, Any color, notice flat on LED and match to flat on footprint. Super Bright Blue LEDs can be use here

Push Button Switches - Top or Front Push

____3 - PC mount Push Button Switches - top pushing. These will be the ones most likely in the kit.
Mount Push Buttons through holes and solder.


____3 - PC mount Push Button Switches - front pushing.


Push Buttons mounted with forward tab over soldering point.


Solder forward pins.


There are three steps to solder the switches on the bottom side of the board:

The steps are shown below:
1. Solder a wire to the switch - the connection that a trace does not connect to.
2. Solder the other end to a ground via as shown.
3. Trim excess wire.
Do this to all three switches - only one step per switch is shown below, finish all steps on each switch.


Be careful, notice yellow arrow above and don't short that plated
through hole to the wire jumper on the third push button switch.

Rotary Encoder


Top Mounting || Forward Mounting || Bottom Mounting

Forward Mounting is the most convenient to use. Three wires, two for the switch and one to ground hold the encoder firmly for easy rotation.

The Top Mounted Encoder requires moving the corner spacer to give room for a knob but is the most secure. Easy to use the encoder switch as you push down with stable operation.

The Bottom Mounted Encoder allows the easiest access to the switches. Number 1 is rarely used so this isn't very important to do as switches 2 and 3 can be reached with the top mounting also.

Review the instructions for each mounting first and decide which one you would like. Notice a small notch was made on the top corner (two pins) of the encoder to remove a curved spring to eliminate the clicking for effortless turning.

Rotary Encoder Top Mounting

When using a Top Mounted Encoder, in order to use a knob the spacer at the corner will have to be moved to the right and the holes drilled with a 9/64" drill bit. The bottom spacer can be held with a screw and a nut and screw will be needed at the new location for the upper spacer. The longer spacer 1 7/8" will be used between the boards and the smaller ones for the bottom.

Note: The Mechanical rotary encoder included with the kit has a metal bottom. This will short out the pads underneath the encoder. Place a piece of black tape over the pads that will be under the encoder or place a piece of black tape on the back of the encoder as shown below.

Install the encoder as shown below. There is a box labeled Switch through which the two leads will fit. This switch is connected to Button 3, which is used to set the transmit frequency with Button 1 which is connected to the transmit key.
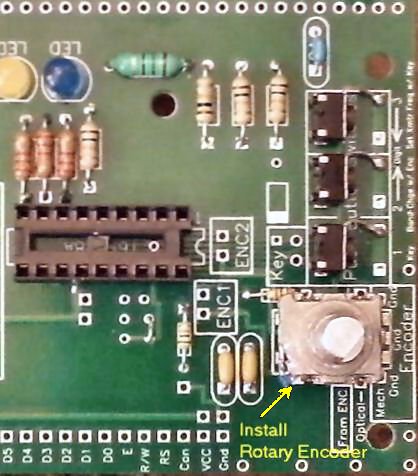
Picture below shows how the spacers are arranged to allow a top mounted encoder. If the holes have not been enlarged to fit the spacers, drill with a 9/64" drill bit.

There is a lot more space between the encoder knob and the top PCB than the picture shows. One nut and screw is needed to make the move. There is room to access button 1, but it is rarely used.

Be careful not to short the spacer to the switch pad.
See yellow arrow:


Rotary Encoder Forward Mounting

____1 - Mechanical Rotary Encoder mounted forward

Wires connected to the switch leads and a wire soldered to the left side tab give support to the encoder.

Solder the three pins underneath the board first. The encoder will not be flush with the board because the pins widen half way down.

Remove the upper spacer from the corner and replace with a screw so there will be plenty of room to solder the support wires for the encoder. Replace the spacer when finished to continue soldering parts on the board.

Use cut resistor trimmings or larger wire for a firm mounting. Cut three pieces 3/4". This strengthens the mounting of the rotary encoder. The side tabs have been bent over the side of the encoder and the one on the left is used to solder a support wire.

Two wires from the switch box go to the leads for the switch on the top of the encoder. Solder the wires to the encoder leads as close to the body of the encoder as you can get (provides more stability).

A Ground connection for the encoder is run from the - hole (Optical ground) to the bent over side tab of the encoder on the left side (Looking from the front). This wire helps stabilize the encoder a lot.


Bottom Mounted Encoder

When the encoder is mounted underneath the board, the rotation for increased frequency is reversed. The Encoder wires from the PIC have to be reversed so that turning the encoder clockwise will still increase the frequency.

The traces from ENC1 and ENC2 to box 1 and box 2 of the encoder mounting footprint are cut and then wires are installed from ENC1 to box 2 and from ENC2 to box 1. Check with a DVM to make sure they no longer conduct.

Three one inch bare wires (#22 or larger) with a 90 degree bend at the top are installed in the Switch Box and one in the minus Optical Box to hold the encoder below the board and soldered as shown.The leads go underneath the board to be used on the encoder. Next, install the encoder from the bottom side of the board and solder the leads at the top of the board.


Turn the board over and solder the switch wires to the top two leads of the encoder. Straighten these wires and solder the leads close to the encoder as shown. Solder the ground wire to the tab on that side of the encoder and then trim extra lead length.

With this mounting, the longer 1 7/8" spacer is used on the bottom and the shorter spacer 1 1/4" is used between the boards. The switches are easily reached with this mounting.

____1 - 1N914 Diode, notice placement of black band with white band on footprint.

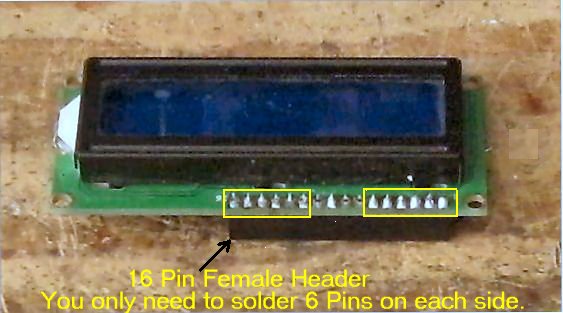
----1 - 16 Pin Female Header. Solder one pin, check to make sure the header is straight, heat the solder and reposition if necessary, then finish the other pins.

Solder on the bottom side of the board. The LCD readout will be underneath the board.

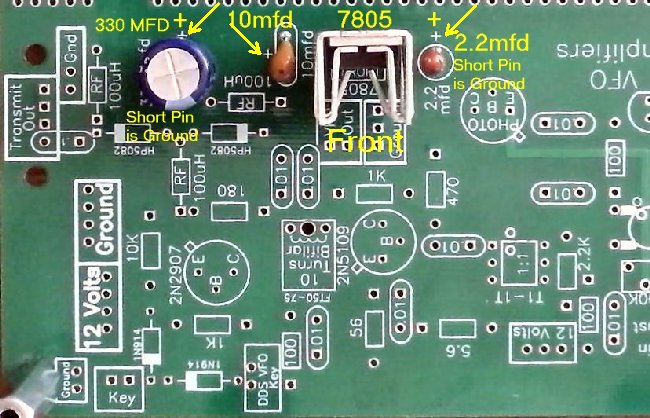
____1 - 330 MFD Electrolytic Capacitor, short pin is Ground, notice + orientation
____1 - 10 mfd Tantalum, 3 Pin, middle pin is + (Positive)
____1 - 7805 Regulator, Notice front of part goes toward middle of board
____1 - Heat Sink, place heatsink on 7805 before soldering on board. Different heatsinks will be used, if the heatsink hits the 10mfd Tantalum, solder the regulator high enough so the heatsink clears the capacitor.
____1 - 2.2 mfd Tantalum, short pin is Ground, notice + orientation

____1 - LCD Display, White characters with Blue Background
____1 - 16 Pin Female Header

Making Connections

See Making Loops for Connections on the Boards for making easy connections to the board for testing and completing the board. Click 'Back' on your browser to return here.

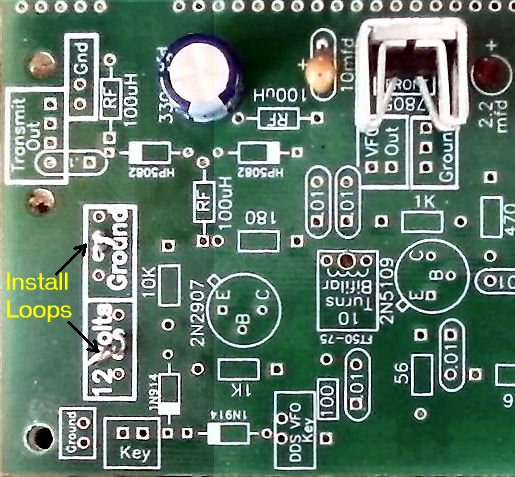
Place two loops, one at the 12 Volts and one at the Ground connections.

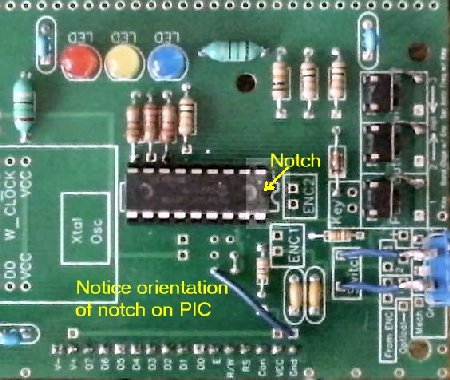
____1 - PIC IC 16F628 - Install on board

____1 - 1.5K resistor. The leads are bent underneath the resistor a little bit so it can go into the holes. There wasn't enough room for a regular resistor footprint.

The white line between two plated through holes marked "B" determines the brightness of the LCD. A wire short between the "B" connections is full brightness. A 1.5K resistor has worked well for the LCDs purchased for the kit, but can be changed to any value for the brightness one desires.

Soldering the resistor to the top of the plated hole makes it easier to change out.

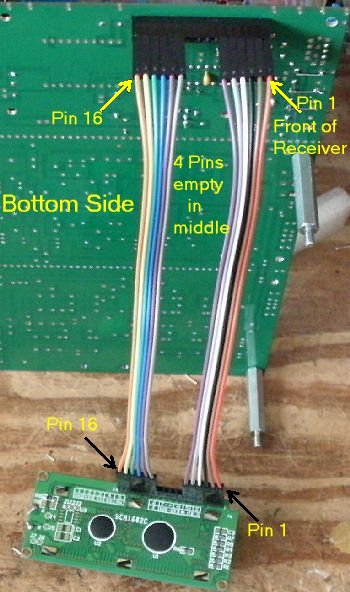
Power can be applied to the "12 Volts and Ground" box and the first test can be done. The LCD readout will be connected and 12 Volts and Ground from a power supply will be attached to the Loops just soldered onto the PCB.


Attach 12V and Ground

The display should read 7.000.000 at first power up. If the chip was tested it will show something like in the picture above.

Switches 2 and 3 will move the cursor. Switch 1 is used for Transmit Key function and will not do anything when pushed by itself.

Push the encoder to engage switch (connected to Switch 3) and push Switch 1, Release the encoder, then push Switch 1 again. (Switch 1 is connected to the "Key" output.) You will see Xmtr on the display. Turn the encoder and you will see Rcvr and the frequency changing.

To change bands, push Switch 2 and turn the encoder within one second.

After testing, you can disconnect the cable from Board 1 and set the LCD aside. You will be mounting it with plastic ties right under Board 1 when you get to Mounting/Testing Board 1

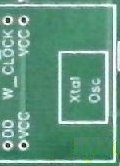
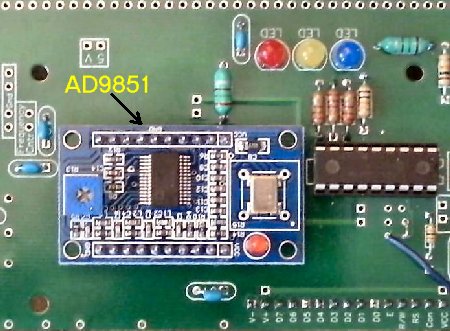
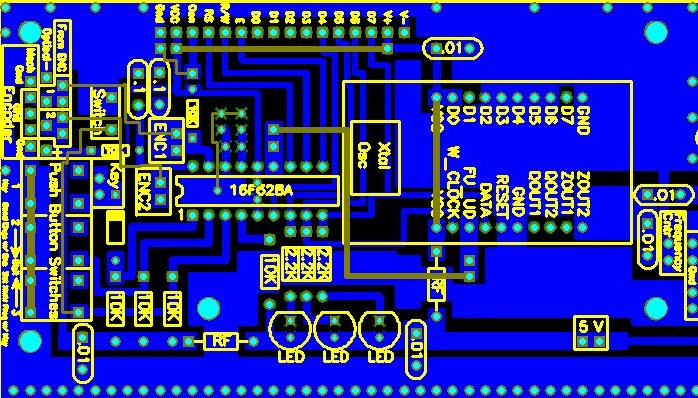
____1 - AD9851/AD9850 DDS Module, Inside the DDS footprint, on the side toward the PIC, you will see a small square labeled "XTAL OSC", make sure you insert the AD9851 DDS Module with the silver square (the crystal oscillator) on the board above the "XTAL OSC" on the footprint.


If desired: Two 10 pin plug in spacers can be soldered onto the PCB board for the AD9850/AD9851 for easy changing in case of failure or change of module. Have the plug in spacers installed on the DDS module when soldering to make sure the DDS fits into the spacers easily after soldering onto the board.

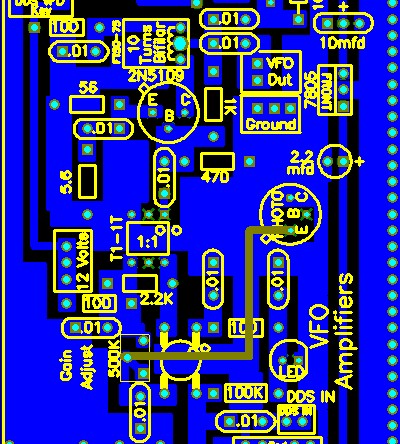
VFO Amplifiers


The parts for this section are in Bags 1 through 6 as noted with the parts.


____10 - .01 capacitors (Bag 3)

____3 - 100 ohm resistors (Bag 3), (brown, black, brown)

____1 - 100K resistors (Bag 3), (brown, black, yellow)
____1 - 1K (Bag 3)
____1 - 470 ohm (Bag 4)
____1 - 2.2K (Bag 4)
____1 - 56 ohm (Bag 5)
____1 - 5.6 ohm (Bag 5)

____1 - MOSFET (Bag 2), (Picture) static sensitive part, touch a ground wire before taking it out of the bag, notice the dot on MOSFET (may be difficult to see, hold at an angle to a light source and you can see the shadow of the dot), the dot is located to the left of the second line of the text on the MOSFET. A dot is placed outside the footprint so that you can double check your placement after it has been inserted or soldered to the PCB. The leads on each side of the part need to spread apart slightly to fit the footprint. See Picture of MOSFET for details.
____1 - 500K trimmer, stands upright, marked 504 (Bag 6)
____1 - LED (Bag 3), Match flat of the LED to the flat on the footprint.
____1 - Phototransistor (Bag 6), You will have either a black colored Phototransistor (it looks like an LED) with two leads or a BPX 38. The "B" connection is not used on the BPX 38.

With the black colored Phototransistor the short lead (has a flat on the side) goes into the "C" connection. The long lead (round side) goes into the "E" Connection.

Mount phototransistor as high as possible using all the lead length. Push the part through the holes, then spread the leads slightly, then pull back up. This will hold the part while soldering.

With the BPX 38, Note the picture below in mounting the part. The Tab is the E connection, B is between the two leads, and C is opposite E.

The Phototransistor can be bent (90 degree angle) towards the First Mixer in Section 3 of the board as shown in the pictures.

____1 - T1-1T Minicircuits transformer (Bag 4), Note the dot on the T1-1T transformer and match the dot on the silkscreen. The dot on the outside of the footprint can be seen after the part is mounted so that you can double check proper mounting.

____1 - 2N5109 transistor and heatsink (Bag 5)

Push the Heatsink on the 2N5109 first. There will be other types of heatsinks in the kits, so make sure you know where the tab is before mounting onto the board.
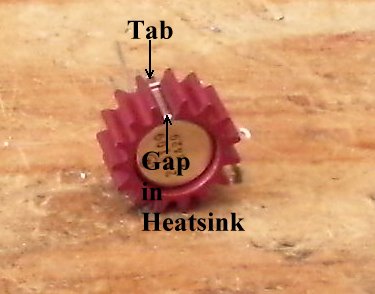
Solder 2N5109 with Heatsink about 3/16" to 1/4" above PCB.
Note location of tab. Solder one pin, straighten up the transistor, then solder the other two leads.

____1 - FT50-75 ferrite core (Bag 4) and wire (Bag 6)
____1 - One of the 8 3/4" Black/White wires

Notice below the end of the insulation of the wire overlaps the edge of the core about 1/4". This centers the wire so that both ends have the same amount of insulation over the edge of the core. Wind very tight.

____1 - Bifilar ferrite core

Diode Transmit/Receive Switch

All Parts for the T/R Switch are in the Bag labeled "T/R Switch Parts"


____1 - 180 ohm resistor, 1 Watt - The leads will fit in the holes, but the resistor is larger than the footprint, bend the leads a little inward under the resistor. The resistor runs warm, so it is best that it is in the air above the board. Do not force onto the board.
____1 - 10K resistor
____1 - 1K resistor

____4 - 1N914 diodes, Bend leads down 1/8" away from the diode to match the holes of the footprint. Match black band on diode to white band on footprint. Two of the footprints are marked HP5082, they had excessive loss.
____1 - 2N2907 Transistor, Note tab on transistor and match to footprint

____1 - .1 capacitor
____3 - 100uH RF Chokes. FT50-75 core, wind 5 turns on core (4 1/2" wire length), clean leads, insert into footprint. Remember, count the number of turns by how many times the wire goes through the center of the core.

Making Wire Loops

Installing the Wire Loops

____2 - Wire Loops
The wire loops for the 'VFO Out' box and 'Ground' are installed underneath the board. The coax cable from the 'VFO Out/Ground' box goes to the First Mixer 'VFO IN/Ground' box. This cable will be installed after the board is populated.

The Wire Loops for the Transmit Out and Ground, Key and Ground, and DDS VFO Key are not installed in the SWL version of the BLT.

SWL AM Detector Modifications Click here

Double Checking Your Work

____Check the dot on the MOSFET and the Minicircuits transformers.
____Put the bottom of the PCB in front of a bright light. If you see light shining through any of the soldering holes, you missed a solder connection.
____Did you remember to set the "Gain Adjust"(blue 500K trimmer)to about 250K? (1st VFO Amplifier)
____Make sure the 330mfd Electrolytic and 2.2mfd is mounted correctly.
____Look at all the 100 ohm (brown, black, brown) resistors and check that the size of the footprint underneath the resistor is shorter than the length of the resistor body.
____Look at all the 100K (brown, black, yellow) resistors and check that the size of the footprint is as long as the resistor body. Look for the bright yellow band to find these resistors.
____Check the tab on the 2N2907 and 2N5109 transistor and make sure it matches the footprint.

Send E-Mail || Amateur Radio Receivers || Back to SWL Instructions for the Blue Lightning Transceiver


Last Update: 11/14/2019
Web Author: David White, WN5Y
Free Website Translator