A full QSK QRP T/R circuit from W1FB's QRP Notebook is used at the end of the VFO Amplifiers to switch the output from the receiver to the output for a transmitter. It uses two 1N914 diodes and three 100uH RF chokes and a PNP transistor switch. It is isolated using another 1N914 diode from the emitter of the PNP switch to the KEY box on the PCB board. Two diodes are used to isolate the keying of the T/R switch and the DDS VFO. The bands of the diodes (1N914, 1N4148 or similar) are tied together at the bands and go to the KEY switch at the edge of the board next to the T/R switch. One of the Anode sides of the diodes goes to the T/R switch (Ground switches) and the other anode goes to the DDS VFO transmit function (eliminates the offset frequency). If you are using a separate DDS VFO, check the documentation of your DDS for instructions on keying the transmit offset function. One of the advantages of having the T/R switch at the end of the VFO amplifiers is that separate antennas can be used for transmit and receiver. The power used for transmit comes from the T/R switch and the receive antenna goes to the Antenna Input at the FM filter before the RF Amplifier.If you are not using an amazing antenna farm with all sorts of beams, then having a special antenna that works for low noise reception, especially for 20 Meters and below, would be beneficial for excellent reception. For an article that goes into detail on great receiving antennas, check out "Receiving Antennas, A discussion of special purpose receiving antennas - including some novel ideas for improved performance on the lower bands," by Robert L. Nelson, K6ZGO, Ham Radio, May 1970, pg. 56. A book on the topic is "Receiving Antennas for the Radio Amateur", by Eric P Nichols, KL7AJ. It is available from Amazon. |
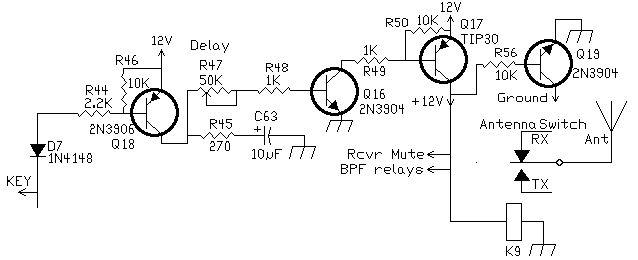
Antenna T/R Relay CircuitsKeyed T/R CircuitThe first schematic shows the circuit that will use a key to control antenna switching. The 50K pot (R47) "Delay" is set for whatever delay is needed for comfortable CW operation. I did not use the 50K pot (R47) as the 1K (R48) gave me a second or two delay which was fine for moderately fast CW. I also changed the 10mfd capacitor (C63) to a 1 mfd to get a delay that worked for 25 wpm DXing. The relay has a 12V coil. Make sure to put a diode (1N914 or equiv) across the coil or it will blow the transistor. |
RF T/R CircuitAn RF T/R switch is easier to build and is a variation of the WA2EBY RF T/R switch. To make it trigger with the 200mW from the BLT transmit out, R1 was changed 1 Meg. This increases the sensitivity of the T/R switch. Go to higher values (up to 10 Meg) if necessary. The 2.2 mfd tantalum can be an electrolytic and can be varied to increase/decrease switching time. The 2.2 mfd has been fast enough for high speed CW. |
The Zener is not used with 12 Volt transmitters and 12 Volt relays. It is used when a 24 Volt transmitter is used with a 12 Volt relay. The Manhattan layout needs to be copy/pasted into a picture program (IrfanView (Free)), resized to 2.84" by 2.04", mirrored, DPI set to 180, and printed. The pads are placed on the mirrored layout with Blue Stick, a reusable adhesive putty (or any substitute). With single sided PCB, the copper side is placed down on the layout as shown below. Super glue is placed on top of the pads and a single/double sided PCB is pressed on the pads. After the glue is set (couple of hours at least), the paper is peeled off the pads and the adhesive putty (save it, reusable) is removed from the pads. Put the regular layout above the board and use it to mount/solder the parts. Installed at the output of the Bandpass filters. |
The output of the BLT is 200mW, a good starting point for QRPp operation. All that is needed is a set of lowpass filters for the bands that will be used. Shown below is a block diagram of the setup for QRPp. A very useful .pdf article on lowpass filters for QRP transmitters: A short guide to harmonic filters for QRP transmitter output by Revd. George Dobbs, G3RJV. It gives practical examples for lowpass filters using W3NQN 7 element standard value capacitor low pass filters with the smallest usable toroidal core for output powers. It shows practical examples for transmitters under 10 Watts RF Output up to 100 Watts. Very low cost filters can be built with T37-2 or T37-6 cores on small pieces of PCB board. Check KitsandParts for toroid cores and mica capacitors. Easy QRP Low Pass FiltersShows how he built the filters from the George Dobbs article. |
Fixed Attenuator Calculator Online:
Will calculate any impedance and any desired attenuation. |
QRP-PA 2008 || Universal 5 Watt QRP Amplifier || Universal 10 Watt
JBOT QRP Linear Amplifier ||
10W HF Linear PA from QRP-Labs
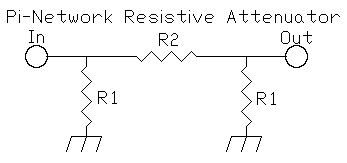
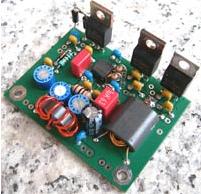
The QRP-PA 2008 is the DLQRP power amplifier sold by the German QRP club. This amplifier can put out a maximum of 10 Watts and has worked very well. Very rugged as I have unintentionally tried to destroy it and never was successful. The output of the receiver (a 2N5109 amp) is enough to easily drive a QRP amplifier between 5 to 10 watts. I used the QRPproject QRP-PA 2008 single balanced MOSFET kit from Germany. It produces equal output from 80 to 10 meters and is very stable. It is very easy to build. The only negative is that you have to supply your own heat sink for the MOSFETs. The MOSFETs are mounted so they can be screwed to the back of a case for heat sinking. The link to the project on the web is the following: The BLT has about 200mW output and the DLQRP amplifier only requires 10mW to get 10 Watts out. A 3dB pad has been used, but up to a 10dB pad has been used to lower the output to 2 watts. A 6dB pad would be a good starting point for 5 watts. The bias of the MOSFETs can be lowered from the recommended 120ma to lower the output also. |
This kit is produced by "Kits and Parts dot Com" and is the Universal 5 Watt QRP Amplifier for $19 I have tested this kit with the BLT and it worked well. It has a 10K pot in its pre-amp to set the gain and can be moved to a front panel control. The kit puts out approximately 5 watts out on 40 and 30 meters, about 3 watts on 20 meters, and 2 watts on 17 meters with this transmitter setup. It has a 2N2219A driver built in the kit with a gain adjust pot as mentioned above. Just connect it to the BLT transmit output. His instructions for winding the toroids are excellent. |
This came from Kit and Parts but has been discontinued. Has a 2N5109 input driver so it takes very little to drive it. An 8dB pad between the BLT and this amp will probably be enough. |
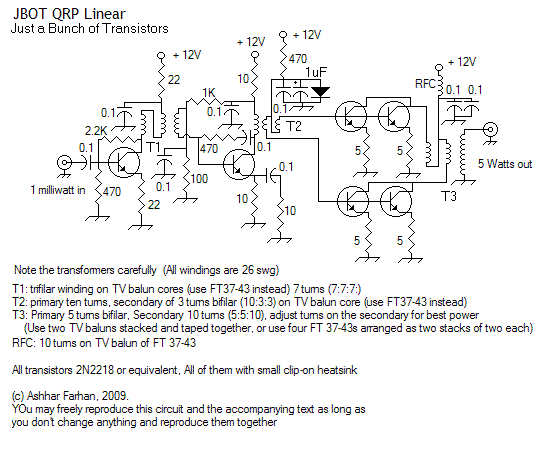
This is a very inexpensive 5 Watt linear amplifier made from Just a Bunch of Transistors - hence its name JBOT. Some web sites are the following: A homebrew project deluxe from Ashhar Farhan, designer of the BTX20. Several hams have built this amp on the QRP-L list. I have not built the JBOT so can't say much about it. The amplifier requires one milliwatt of drive. A 6dB resistive PI pad is needed to lower the drive from the BLT. The pad helps stability too. The type of transistor is not critical - any Ft500 MHz transistor with the same power rating of the 2N2218/2N2219 would probably work. The JBOT on Steroids uses 2SC5739s for 7 Watts output. 10W HF Linear PA from QRP-Labs |
Info from the website: "The push-pull driver stage uses two BS170 transistors in the amplifier design used in the SoftRock transmitter stage. The final uses two IRF510 transistors in push-pull. Yes, this humble low-cost MOSFET really is capable of excellent performance all the way up to 10m band and beyond! Short lead-lengths and PCB layout are extremely important, they are the key to success." |
The Antenna T/R Switch was built and mounted on the bottom board. The 12V power to the relay in the control box goes to a RCA phono jack mounted on a rear plate mounted on the bottom board. The key line is connected to the other keyed circuits all going to the key connection on the rear plate. |
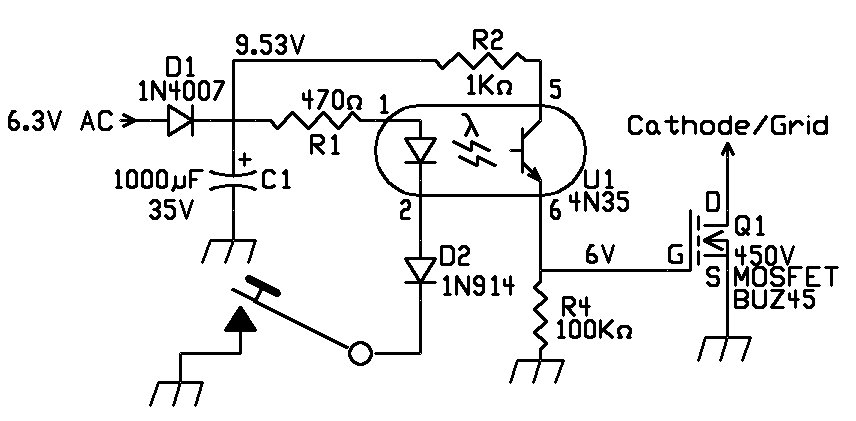
The 50K pot "Delay" is set for whatever delay is needed for comfortable CW operation. I did not use the 50K pot as the 1K gave me a second or two delay which was fine for moderately fast CW. I also changed the 10mfd capacitor (C63) to a 1mfd to get a delay that worked for 25 wpm DXing. The relay has a 12V coil. Make sure to put the diode across the coil or it will blow the transistor. An RF activated T/R switch is found here which is easier to build.T/R Control BoxI built mine with the relay in a coax switch box (for 3 antennas, one is not used). I modified the switch wiring placing a relay inside the box and included a connector for running the control voltage from the switch circuit. Transmitter KeyThe DX-40 uses a high negative grid block voltage at the key. Using a diode here does not work. The other keyed 12V (to ground) outputs do not get grounded sufficiently to work. So a simple opto-isolator circuit is installed in the transmitter key line to isolate the negative voltage from the key line. The DX 60 may not need the MOSFET, connect the negative key line to the emitter of the photocoupler output transistor and ground the collector. Double check the pin numbers for the optocoupler you use (4N25, 4N26, 4N35, H11A10, etc). The 1N4007 can be a 1N4001 or any rectifier that and handle the 6.3V AC. |
The circuit is built on a small prototype board. A 1" to 1-1/2"spacer is installed on one of the screws holding a terminal strip down and the board screwed on the top of the spacer. The MOSFET can be any type that is rated for the voltage used in the grid (grid block keying) or cathode (cathode keyed) circuit of the transmitter. A BUZ45 (rated at 450V) was used here because it was the first one found in the junk box. Grid block circuits use little current, so a much smaller MOSFET can be used that has the required voltage rating (about 100V, grid voltage at power supply is -130V). The opto-isolator can be any type similar to the 4N35. The circuit only uses 10 to 20ma, so it will not load down the filament circuit. The MOSFET is a voltage controlled device, so uses only about 1ma through the 100K resistor to switch the transmitter on. |
Above is a prototype version of a 50 to 60 Watt WA2EBY MRF510 Amplifier, MRF237 2 Watt amplifier, Lowpass Filters, RF Activated T/R Switch, and a 5 amp 12V to 24V convertor. It is mounted on a 8-1/2" by 8-1/2" aluminum plate 1/16" thick. The plate works as the heatsink for the two MRF510s. Holes for the spacers are drilled at the corners and is mounted above or below the BLT. The Bandpass Filters are changed manually with the 12 Volt relays connected in series so the 24 Volt power supply could change the bands. I used this board to get on 80 Meters with additional varicaps used in the Bandpass Filter in the BLT. The 80 and 17/15 meter Lowpass Filters are Diplexer filters described in the article by Sabin, W0IYH: William Sabin, W0IYH, Diplexer Filters for HF MOSFET Amps MRF237 2 Watt AmpMost of the 50 to 100 Watt Amplifiers require 1 to 2 Watts of drive. Since the BLT transmit output is 200mW, an amplifier will be needed to boost the output to the required one or two Watts, with flat gain from 40 to 10 meters. The output of the BLT is flat across the bandwidth of the receiver, 40 to 10 meters, but finding a one to two Watt amplifier with flat gain to 10 meters has been more difficult than anticipated. Of course, the GQRP-PA can be throttled to one or two Watts with flat gain up to to 10 meters, but it seems overkill and expensive to use the GQRP-PA for that purpose alone. In my research I came across a schematic for a MRF-237 amplifier, "The QRP Three-Bander", by Zack Lau, KH6CP, Oct. 1989, QST, page 8 on the ARRL website. Made for VHF frequencies, it was being used in a HF amplifier. It had an unusual pin out of having the metal case attached to the emitter. This meant that the case could be soldered to ground. Be careful when looking for it with a Google search, as the datasheets found had the wrong pinout - with the collector attached to the metal case - don't believe them! A 2 watt amplifier was developed using the MRF-237 with a very simple layout resulting from the fact that the emitter was soldered to the ground plane. A step by step build instruction of this amplifier can be found at MRF237 Amplifier |
Output was 2 Watts flat across 40 to 10 meters. A 3dB pad was placed at the output between the MRF237 amplifier and the WA2EBY amplifier making a stable 1 Watt driver. |
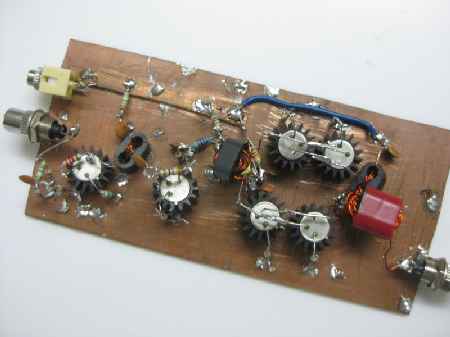
A 50 Watt amplifier I found inexpensive and easy to build Manhattan style was "A Broadband HF Amplifier Using Low-Cost Power MOSFETs, Part 1 and 2", by Mike Kossor, WA2EBY. Part 2 can be found here. The following link shows how to build the amplifier using the Far PCB for the amplifier: The instructions on this site are excellent. I wrote two sets of instructions for building the amplifier, one for the Indian board, WA2EBY Indian Board Build, and one building it Manhattan style, which I found to be very stable and saved a lot of money: WA2EBY Manhattan Board Build, Inexpensive Homebrew Build, with Blue Stick. These instructions show how to lay down the Manhattan pads which makes it easy and accurate. The layout is an advanced one (a recommendation by Allison Parent, KB1GMX, that has the drain connection to the metal tab. The drain lead (Center pin) is cut from the MOSFETs (drain is connected to the tab). This helps with stability by making the distance between the input and output much further. There are two set of instructions for making the Manhattan style board that has the layout for Allison's recommendation to provide better isolation of the drain lead to provide better stability for the amplifier. One uses Blue Stick ("Reusable Adhesive Putty," available at hardware stores) that is used to attach the traces to a mirrored layout printed on regular or transparent paper. The traces are held on the mirrored layout with Blue Stick turned copper upside down, tops are coated with Super Glue, then laid down on a single sided PCB: WA2EBY Manhattan Board Build, Inexpensive Homebrew Build, with Blue Stick. The second one uses toner transfer paper. The mirrored layout is printed onto toner transfer paper with a laser printer, laid on the PCB and heated to make a layout to which you can lay the Manhattan traces and rectangles directly on the PCB board. Requires having some experience with toner transfer paper and a clothes iron: WA2EBY Manhattan Style Build, with Toner Transfer After gluing the traces on the PCB board, the web page WA2EBY Manhattan Style Build shows how to install the parts. The original article's lowpass filter board was never built because finding the rotary switch has been difficult. The design of the three filter set made it easier to build. Homebrew dead bug techniques work very well for making lowpass filters. The picture below shows the lowpass filters with Diplexer Filters for 40/30 and 20 Meters. They dump the high pass content to non-inductive 50 ohm resistors which keep the MOSFETs cooler and enhance stability. See the article William Sabin, W0IYH, Diplexer Filters for HF MOSFET Amps. I have never blown a MOSFET that was connected to a Diplexer filter. In my opinion it is easier to build lowpass filters homebrew style and much cheaper than using a kit. |
The following picture shows the parts mounted on the Manhattan board. The ferrites are some surplus cores I had plus the recommended binocular core (BN-43-3312) from KitsandParts. My output with this amp was within 10% of the published values in WA2EBY's article. KitsandParts sells a complete ferrite core kit. This layout also has the recommended new connection to the drain of the MOSFETs off the heat sink rather than the center lead which is clipped off to provide better stability. |
12V to 24V ConverterA voltage converter is needed when no 24V power supply is available. They can be ordered from Ebay or Amazon. A 5 amp power rating is needed. The WB2EBY uses 4 amps at 24V. The one shown is the LTC1871 3.5V to 30V step-up 100W converter. It is a 'Step Up Boost Module Power Supply 3.5VDC up to 30 VDC (100W). This particular one is not noisy and has worked well. Others have been tested and were noisy. They can be found on Ebay for $8.43 (3/16/2020). You can use 24V switching power supplies, but need a load to start up. A 500 ohm, 5 or 10 Watt resistor, will provide about 50 mA of starting current. It is placed across the output of the supply. I have needed to add additional filtering and put them in a metal box to get rid of the noise. I have used parts from old computer power supplies to suppress the noise of these switchers. The best source of information on containing switching power supply noise is the following: I used KA7OEI's suggestions and completely quieted a 48 Volt switcher. Excellent information is on his site! |
In the January/February 2021 issue of QEX, Rick Littlefield, K1BQT, writes about a "Compact 300 Watt Amplifier" which only takes 5 to 10 Watts to drive. A 5 Watt driver requires a 3 to 4 dB pad which means that the Blue Lightning Transceiver might be able to drive it directly. He uses two Gemini MRF151Gs which means two identical devices are on a single die that means perfectly balanced matched-pair performance. It looks very simple to build and he even shows the printed circuit boards he designed to put the amp together, but this is not a construction article. It uses a 50 Volt power supply with a smaller board that drops it to 12V for the control circuitry. The article is a primer to help one get started on building one. I personally have never seen a simple design for 300 Watts like this with so little drive to make it produce 300 Watts. The amplifier covers 160 to 6 Meters and he has a schematic for the Low-pass half wave filters (50 ohm in and out). He also uses an output transformer that uses Francis Garcia, WA1GFZ, balanced transmission-line transformer network that eliminates the requirement for shunt-fed chokes and close-couples the two drains for improved IMD performance. I am going to try this design on the WA2EBY transmitter to see if it gives better performance and works well on 6 Meters. The shunt-fed chokes for me have been a easy place for mis-wiring and blown MRF511s and getting rid of them would be a bonus. The pictures below were lifted from the January/February QEX, 2021 article, front cover and page 5. Very interesting! |
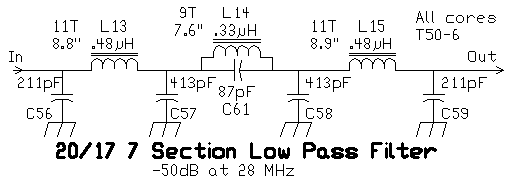
A three filter set for the WA2EBY (or any 50 - 100 Watt transmitter) is the following 40/30, 20/17, and 15/12/10 lowpass filters. These have been used and work well. One does need to be careful that the correct filter is chosen for the band used. A four filter Diplexer set is the 40/30 Diplexer, 20 Diplexer, 17/15 Diplexer, and the 12/10 Diplexer. The MOSFETs run cooler and are very tolerant of mismatches. The dump resistors can be difficult to find but Ebay will have them sometimes. I will try to keep some in stock. Both filter sets can be automatically chosen with the IRED(T) lowpass filter switch. |
A very useful .pdf article on lowpass filters for QRP transmitters: A short guide to harmonic filters for QRP transmitter output by Revd. George Dobbs, G3RJV. It gives practical examples for lowpass filters using W3NQN 7 element standard value capacitor low pass filters with the smallest usable toroidal core for output powers. It shows practical examples for transmitters under 10 Watts RF Output up to 100 Watts. Very low cost filters for QRP operation can be built with T37-2 or T37-6 cores on small pieces of PCB board. Check KitsandParts for toroid cores. He also has a 7-Pole Universal Low Pass Filter PCB board for $4. You can use up to T80 cores for 125 Watts. The site is a one stop place for the capacitors and cores needed to build the filters. He has several links to LPF design and band calculators for making the filters desired. you can build the 7 section filters shown below on these boards. Highly recommended! Another very good source of information is K4CHE Bench Notes, Low Pass Filters Easy QRP Low Pass Filters There are two sites that help design lowpass filters. An SVC (Standard Value Capacitors) lowpass filter program is at SVCFilter. It is very easy to use. I would suggest using the Fco frequencies from George Dobbs article as a starting point for the filters. Another site that designs several types of lowpass filters is at RF Tools LC Filters Design Tool. A very easy online program to have fun with. Also designs high-pass, band-pass, or band-stop response. Four filter types: Chebyshev, Ellipic, Butterworth, or Bessel. |
This filter was designed and analyzed by the AADE Filter Design and Analysis software. |
The version below uses Standard Value capacitors. the 201pf's are 200pf, the 83pf is 82pf and the 393pf is 390pf. Looks same as plot below using a noise generator and a Spectrum Analyzer for testing. |
This filter was a design that came with Elsie, ham20.LCT, and modified by expanding the tuning width, "TuneW", until the VSWR at 18 MHz was 1.01. Of all the filters tried, this one turned out to be the best. |
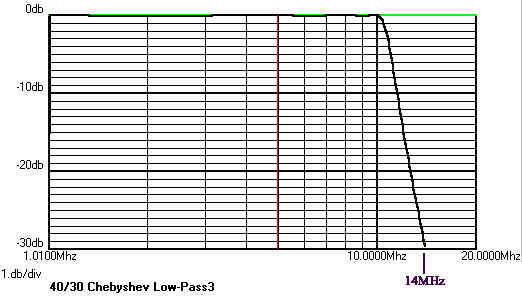
This filter is a SVC design modeled in Elsie. See the January/February 2011 issue of QEX (Pg. 29), "Seventh-Order Unequal-Ripple SVC Low-Pass Filters with Improved Second Harmonic Attenuation", by Dave Gordon-Smith, G3UUR, for information on these filters. Below is a picture of the lowpass filters. These were bulit with some IR device switching (on the right) that were later replaced with the Low-pass Filter Switch. The LEDs on the far right indicated which filter was on, or to make sure it was on! When using the WB2EBY MOSFET amp, second order harmonics are estimated at 30dB below the carrier. So by the numbers, this filter should have the second harmonic of 15 meters (42MHz) at least -40dB meeting the FCC requirements. The filter takes care of the second harmonics of 12 Meters (48MHz) and 10 Meters on its own.
|
I only used a non-inductive 5 or 10 watt 50 ohm resistor for the 50 Watt WA2EBY. The four 200 ohm, 5 Watts resistors can sometimes be found on Ebay: 10 pieces 5W Metal Oxide Film Resistor 20 Meter Diplexer Filter |
I only used a non-inductive 5 or 10 watt 50 ohm resistor for the 50 Watt WA2EBY. 17/15 Meter Diplexer Filter |
I only used a non-inductive 5 or 10 watt 50 ohm resistor for the 50 Watt WA2EBY. 12/10 Meter Diplexer Filter |
I only used a non-inductive 5 or 10 watt 50 ohm resistor for the 50 Watt WA2EBY. |
In the BLT, commercial IRED emitters can used in the IRED(T) footprints in the Bandpass Filters on Board 1. This commercial pair of emitter/receiver and optical cable can to used to automatically switch the lowpass filters of the transmitter. They are used with the Bandpass Filter potentiometer to switch the lowpass filters used in the transmitter to automatically switch the filters in tandem. To install the IRED(T), there is a jumper trace in the footprint for the IREDs. That needs to be cut underneath the board and checked with a VOM to be sure there is no continuity. The short lead on the Blue Emitter goes to the flat of the footprint. This should orient the left IRED(T) toward the left of the PCB. The right Blue Emitter will need to be turned counter clockwise a quarter turn after soldering to be pointed to the left of the PCB. The optical emitters (Blue color) are pointed to the left hand side of the PCB soldered in the footprint. They come on with the selection of the Bandpass Filter. The following Optical Fiber kit is used: Commercial Pairs w/1000µm Optical Fiber
Commercial Matched Pair Receiver/Detector
This pair of emitter/receiver and optic fiber is called the Experimenter's Kit IF-E10 in the Fiber Optics Kit section of Industrial Fiber Optics, Experimenter's Kit IF E10 web site. It contains a matched pair emitter/detector as pictured above and 1 meter of 1000µm optical fiber.
Blue - IRED Emitter || Black - Phototransistor Receiver Two kits are needed to build this switcher. Lowpass Filter Relay SwitchesThe schematic of the Lowpass filter relay switches is below. It comes from the "IC OP-AMP Cookbook, by Walter G. Jung, 1983, pg. 337", a staircase window comparator. It is modified to have two windows. As shown below it has a high voltage and a low voltage window with the switch point determined by a 50K potentiometer. The operation works from the fact that when the inverting terminal is greater than the noninverting terminal, the output swings from Vcc to ground and the output gets turned on. This also depends on whether the output is a transistor output or logic output, which operate opposite of each other depending on how they are hooked up. The transistor output brings the output to ground and the logic output goes to Vcc. The LM339/LM393 is transistor output and the LM324 (single supply op amp) is logic output. Each of the Bandpass filters use two lowpass filters to filter the output of the transmitter. The 40/30/20 Meter Bandpass filter uses a 40/30 Meter lowpass filter and a 20 Meter lowpass filter. The 17/15/12/10 Meter Bandpass filter uses a 17 Meter lowpass filter and a 15/12/10 lowpass filter. Other variations are a 17/15 Meter lowpass filter and a 12/10 lowpass filter. The 20 and 17 meter lowpass filters can be combined or separated. The LM339 comparator has an open collector output. The section of the LM339 that is off has 12 volts at the output, turning on the transistor and the lowpass filter relays it is connected to. When the section is turned on, it brings the output voltage to zero and turns off the relays. If you use different op amps, which will work, they may have a 12 output when turned on, which is the opposite of the action of the LM339. An example is the single supply LM324, which I used with my first prototype. The high voltage portion of the 40/30/20 Bandpass filter switches on the 40/30 lowpass filter and the low voltage portion switches on the 20/17 lowpass filter. The high voltage portion of the 17/15/12/10 Bandpass filter switches on the 20/17 lowpass filter and the low voltage portion switches on the 15/12/10 lowpass filter. The reason for the 50K pot instead of fixed resistors makes it useful for different Bandpass filter designs with different coil inductances, which will move where the bands are on the Bandpass pot, especially when 80 meters and 6 meters are used. There are designs that use fewer turns on the 40/30/20 Bandpass filter that would require a different switch point. The 50K pot leaves it open to be used on any varicap tuned Bandpass filter. In the following schematic, there are two connections to a 20/17 Lowpass filter and they are isolated from each other with 1N914 diodes. This is not necessary with the op amp inputs since they are high impedance and are off when not used. |
This circuit can be expanded with a LM393 dual op-amp to have three windows so each filter section can utilize three lowpass filters. Construction of the circuit is easy and uses 2N3904s to drive the relays. Larger 2N2219s can be used for larger relays and currents. It is important to include the 1N914 diode to protect bipolar input stages, either within the IC or added externally. The 4.7K resistors are used to limit the current to the base of the 2N3904s and diodes are used across the relays to prevent spikes from destroying the transistors. (IC OP-AMP Cookbook, page 341-2) The following is the layout using Manhattan type building. Notice the .1 mfd capacitor at the plus terminal of the LM339, Pin 3 and 4. Pin 11 and 12 are grounded. A 14 pin IC socket is used and all the pins are bent horizontal and laid down on the pads. Pin 2 and 13 are not used (output pins) and are left unconnected. It is important to check that the pins are soldered to the pads. They are difficult to solder and found this was the most common error in building the circuit. Take a VOM and check on the 14 pin socket to the pad to make sure there is continuity before installing the board. |
The layout below widens the outlines of the pads for printing with toner transfer paper onto a PCB to help place the Manhattan pads. This image is mirrored for printing onto the toner paper. Two boards are made, one for the 40/30 and 20 Input Bandpass filters and one for the 17 and 15/12/10 Input Bandpass filters. |
The picture is loaded into a picture program and adjusted to the following size: Width - 4.055 inches, or 811 pixels at 200 pixels per inch Height - 2.035 inches, or 407 pixels at 200 pixels per inch The default resolution of most picture programs will be 72 pixels per inch. Be sure to check and change to 200 pixels per inch to get the right size if you have to use pixels. You can use IrfanView (Free). IrfanView has a 32 bit and 64 bit version for everything from Win 98, XP, up to Win 10. After doing a Right Click, Copy on the mirrored image, with IrfanView, do Edit/Paste, go to Image, Resize/Resample and Click on "Set new size", and enter the size in inches. You can use either the Blue Stick or Toner transfer technique used with the WA2EBY amplifier. The following is the mirrored image: |
Toner Transfer MethodUse a ruler and utility knife to cut the image from the toner transfer paper to get straight edges. Then tape one end to the PCB board, pre-heat the PCB with the iron, lay the paper over the PCB, then run over the paper with the iron several times to get the toner moved to the PCB. Place the board/paper in warm water, let soak till saturated and gently remove the paper from the PCB. Cut 1/8th inch wide PCB strips to match the pads on the board and glue with Super Glue. |
Blue Stick Method |
This is an expanded circuit if you need to control other functions with the same timing and delay of the antenna switching. The 50K pot "Delay" is set for whatever delay is needed for comfortable CW operation. I did not use the 50K pot as the 1K gave me a second or two delay which was fine for moderately fast CW. I also changed the 10mfd capacitor (C63) to a 1mfd to get the one or two second delay. D7 diode isolates the keying of this section. Q17 provides 12 volts (Key closed) to whatever needs 12 volts to switch. With this transceiver, Q17 switches Mute (Board 2 IF strip), and the Antenna Relay. Q17 can be any PNP 1 amp transistor. A TIP30A, B, or C will work or any other TIP PNP low frequency transistor rated at 1 amp or above. I modified the output so I could send a + signal to a relay in a three port antenna switch. Placing the relay in the antenna switch helps keep an impedance "bump" to a minimum and isolates the RF in the antenna switch box. Q19 provides a Ground for any circuits that need a ground to switch. If a different setup is used this provides a built-in ground switch in case one is needed. |
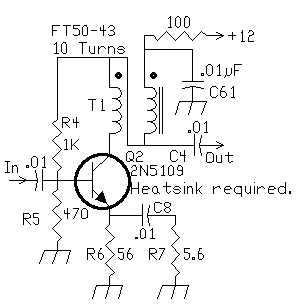
The following drivers may be needed with the Transmit output of the BLT to drive some Novice transmitters. Some 100 Watt amplifiers may need the added amplification. If more drive is needed, a 5 or 10 Watt QRP amplifier could be tried. This circuit comes from the Solid State Design book and is in several ARRL Handbooks. A very generic, stable design used for receivers and transmitters. .
One of the best broadband low level amplifiers ever from the Progressive Communications Receiver. Can't go wrong with this circuit for following a diode mixer or for stability in a transmitter amplifier chain. KitsandParts has a kit using the 2N5109 that equals this circuit for stability and amplification. Can be substituted for this circuit if you want to order a kit rather than 'deadbug' or Manhattan homebrew. Uses a slightly different circuit than above. Another similar circuit using the 2N5109 is the "Low Band High Performance Preamp, by Larry, W7IUV". W7IUV spent a considerable amount of effort designing this amplifier. It does work up to 30MHz and designed specifically as an RF amplifier for the front end of a receiver. Uses precision resistor values and an additional resistor in the feedback circuit. An excellent paper well worth reading. Could be built on the KitsandParts kit. |
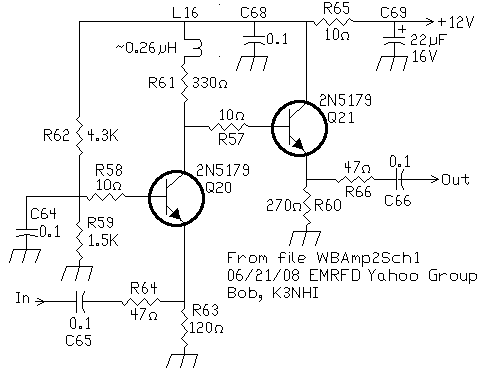
Introduced in an post on the EMFRD Yahoo group but didn't seem to have the output of the previous circuits. Very stable and flat gain up into the GHz range. If you love to experiment, try it out. |
Revisiting the WA2EBY Broadband HF Amplifier A very useful .pdf article on lowpass filters for QRP transmitters: A Complete DO-IT-Yourself-Kit by Revd. George Dobbs G3RJV Jun 1988 - QEX (Pg. 8), Designing LC Filters Using SVC Filter Tables, By Ed Wetherhold, W3NQN Jul 1988 - QEX (Pg. 4), Designing LC Filters Using SVC Filter Tables (June 1988 QEX), (Feedback) Nov/Dec 2006 - QEX (Pg. 31), Seventh-Order Unequal-Ripple Low-Pass Filter Design, by Dave Gordon-Smith, G3UUR Nov/Dec 2016 - QEX (Pg. 29), A More Efficient Low-pass Filter, by Gary Cobb, G3TMG Toroid Videos - interesting information! https://www.youtube.com/watch?v=eDSs2ZfAKCQ https://www.youtube.com/watch?v=Yh7_XuHqbRI https://www.youtube.com/watch?v=Nqgh-4OKzpw |
Send E-Mail || Amateur Radio Receivers || Back to Ham Radio Instructions for the Blue Lightning Transceiver